Today I am going to describe my experience coding in assembly and I’m going to demonstrate the two versions of the simple program written purely in Assembly. Note, the code below is the result of the group work with Nathan Misener, Fahad Karar and myself.
The program we wrote performs a very simple task, it is looping 30 times while outputting the iteration number. Below is the exact output of the program:

We have written the two versions of this program: x86_64 and aarm64 architecture versions, so we had a taste of assembly programming on each of these architectures. We were following gas assembly syntax.
Let’s dive into the code for x86_64 arch and discuss the program in details:
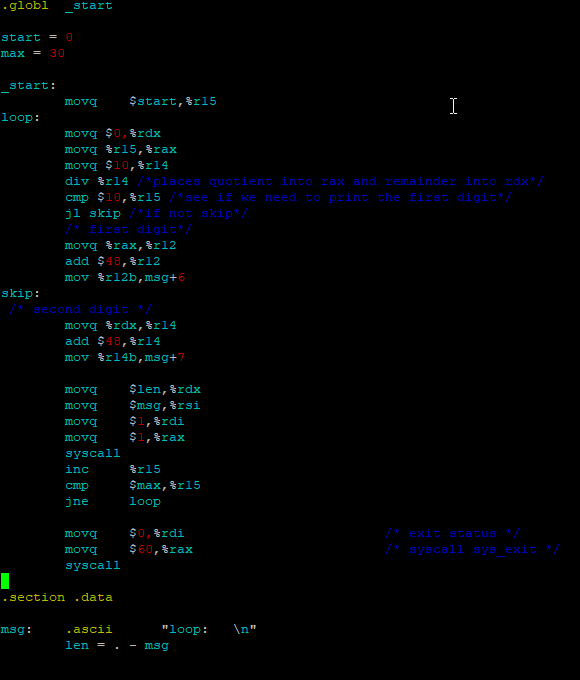
.globl _start – Makes the _start label of the program visible to other files.
start, max – these are variables we will be using in the code. We are going to start our look at the start (0) and look until we reach max (30).
_start – All the programs start with “_start”, so it an absolute must-have.
movq $start, r15 – we move 0 into 64-bit register r15, this is where our counter is going to be stored.
loop: – this is where we start the part of code related to the logic within the loop. “loop” is the name of the label.
The three first movq – explained in the next operation.
div %r14 – this is a division instruction which has some very specific behaviour. Notice that we are specifying here only one register, where we stored the value of 10. This is because division instruction on x86_64 has pre-set registers for storing the result of the operation. “[div] divide[s] rax by the given register (r14, in our case), place quotient into rax and remainder into rdx (rdx must be zero before this instruction)”. This is why we are setting the registers to some specific values with “movq”. The r14 stores the value of 10. Rax register stores the value to be divided, which is the counter. Unfortunately, we don’t have any control over where the resulted data is stored upon division, a programmer should just know how the operation is performed. This is a little bit inconvenient and it is also different from aarm64 instructions, which we will review in a while.
cmp $10, %r15 – then we are comparing the counter with the value of 10 in order to see whether we need to print the 1st digit (if the value is greater than 10, the number to output consists of two characters).
jl skip – If the counter is greater than 10, execute the “skip” label (explained later).
Now we proceed to print the first digit. It is going to be printed unconditionally.
movq %rax, %r12 – rax register contains the quotient of the earlier performed division operation. We are moving the value of this register into r12 to perform the addition explained next.
add $48, %r12 – In order to print the value stored in the register, we have to first convert it into an ASCII character. If we check the ASCII table here, we will notice that to convert a number into its ASCII representation we just have to add 48 to its value.
mov r12b, msg+6 – this command is going to put the value of r12 register (our first character), accessing the r12 register as an 8-bit register (suffix “b”) grabbing only 0-7 bits of the stored in the register value, into msg. Here I’m going to jump to the bottom of the program to point to two last program lines:
msg: .ascii “loop: \n” – this line of code declares buffered value msg, which is an ASCII character array. Notice that we have 3 spaces after the “loop:”. This is where we are inserting our counter digits.
len = . – msg – here we specify the length of the msg character array by calculating the number of bits from the current position (after declaring msg) to msg (where the array starts). This approach effectively gives us the length of the msg after we stored it.
Jumping back to where we diverged from the main sequence of commands in the program:
skip: – This part of the code introduces the logic for storing the 2nd counter digit (if needed) with the label “skip”.
movq %rdx, %r15 – as we already know, the division remained is stored by default in register rdx, we are storing its value in r15 register for further calculation.
add and movq – the next two commands serve exactly the same purpose as the ones explained above (when we convert to ASCII and store in msg the first digit).
movq $len, %rdx – store the number of bytes to print as an argument for syscall (will explain it below).
movq $msg, %rsi – address of the string to output. Also required by the syscall.
movq $1, %rdi – file handle 1 is stdout.
movq $1, %rax – system call 1 indicated a write operation.
syscall – System call. “To make a system call in 64-bit Linux, place the system call number in rax, then its arguments, in order, in rdi, rsi, rdx, r10, r8, and r9, then invoke syscall.” This is how the system call is executed. More about it here.
inc %r15 – increment the counter.
cmp $max, %r15 – compare the result with the maximum value.
jne loop – if %r15 is not equal to $max, jump into the code under label “loop”.
After we reach the point when the counter == max, we do:
movq $0, %rdi, movq $60, %rax, syscall – calling sys_exit.
.section .data – put everything below this line in the .data section.
Now let’s have a look at the Aarm64 Assembly code, as it is slightly different from x86_64. Note: I will explain only the pieces of the code, which are different from the x86_64 version and some syntax differences as well. Here is the program:
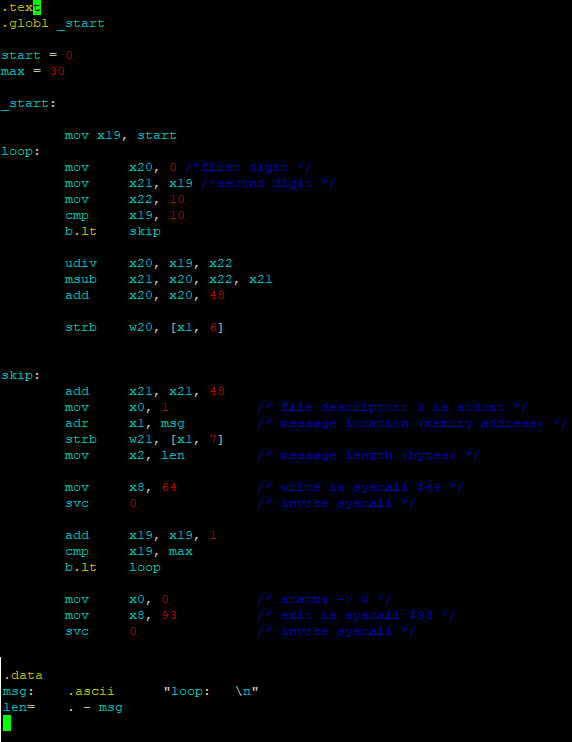
We can see straightforward the difference in syntax. The values are specified without the ‘$’ sign, we also don’t need to put ‘%’ in front of the registers. Registers come first and values afterwards when calling an operation. The declaration of start, max and counter storage are the same. Let’s see the functionality.
In this case, we first set our values to be stored in specific registers: x20, x21, x22. Then we immediately compare the value to see if it is greater than 10 (we do this in order to print just the counter number and not print the leading 0 if the counter is less than 10).
b.lt – if the counter is less than 10, jump to “skip” label, which will print the 2nd or 1st digit of the operation, depending on the counter value. Notice that once the jump is performed, the execution does not return to the next command defined after the “b.lt” line, instead it just proceeds with printing the value.
The skip label will add 48 to x21 register converting its’ value into ASCII, then we perform the actions required to make a call to print: we set the file description to 1 (output), store the message, after which we access the register with the value to print as 32-bit register, we are getting the value from the register x1 and we store it to x1 (the register where we store the msg) to the position 7 (strb w21, [x1,7]). Then we set the length of the message (len), store the number of the command for writing (64) and invoke svc (service call).
In case the counter is greater than 10, we firstly are going to execute the operations immediately below the “b.lt” and then the “skip” part (so it shouldn’t actually be called this way, because this part if getting executed unconditionally). Here we can get an idea of how to perform the division depending on whether we need or not to store the remainder of the division.
udiv x20, x19, x22 – divide x19 (counter) by x22 (value of 10) and store the quotient in x20 (no remainder stored).
msub x21, x20, x22, x21 – load x21 (copy of counter) with x21-(x20*x22) -> 10-(result of udiv * 10). This is how we get the division remainder, which is also our 2nd digit (in case if counter > 10).
We basically override the x21 value in case if the counter is > 10. Also, notice how much control we have when performing division. We can specify all the registers where the data is going to be dumped.
Then we do the same operation as in “skip” code, where we store the value in the x1 register, which holds the msg, this time in the position 6 (so it is going to be our first digit printed).
After the string (character array) manipulation is done, we increment the counter (there is no increment command, so we just used the addition). Then we compare the counter with max value, jump to the “loop” label if the counter is less than max or, otherwise, exit the program by setting the syscall to 93 (exit) and involving the svc.
Conclusion: At first glance, it seems that working with Aarm64 assembly is easier as you have full control over data storage upon operation execution, however, the number of arguments and their order in such commands like msub might be slightly confusing. However, I think that spending some short time on both assemblies, I feel that they are quite similar, in the end, they perform the same operations (maybe in a different way under the hood) and the programs’ logic was just slightly different. I also noticed that I needed some time to switch from my usual coding style (when I code in C#, Java or JS) to be able to understand what exactly is going on in Assembly. Talking about control, you have a lot of control with Assembly, to the point that you can specify which data goes to which register. This is cool, but also provides a lot of opportunities to screw up, since you have to be knowledgeable about the registers you use, what is their purpose, how do they behave, do the data in them persist or being discarded shortly. You have to also be aware of the data types you use. We’ve learnt that when you want to store, let’s say, employee id, we can just use long int, or if you have a larger whole number you can use long long int. But only when I had an opportunity to code in Assembly, I felt how important it is to understand these details deeper and have a very good understanding of what exactly it is that you are doing. Of course, in case of, let’s say, web application (even large one) running on a large powerful production system, most of these details might be tolerated because of all the resources which you can collocate. But if we speak about developing for embedded devices, microprocessor, where you have really limited CPU power and memory size, these details are of incredible importance.
References:
